Quality guidelines for sauna whisks
Sauna whisk
- Made from silver birch.
- Length 50 cm +/- 5 cm (the ends of the branches must not be cut off).
- Weight 350 g +/- 50 g.
- Handle circumference 9.5 cm +/- 0.5 cm.
- Handle length 15 cm +/- 1 cm.
- The handle must be free of leaves and sharp spikes.
- The branches must be clean.
- Branches of a large tree that hang down noticeably are too ‘flabby’, although a few may be included.
- The whisk should have no catkins.
- No branches from a treetop should be used as they are too thin, like blades of grass.
- The branches must not be wet, which means that a sauna whisk cannot be made when it rains.
- The whisk is tied together with a thin length of willow (easiest) or birch.
- The branches are laid with the bottom of the leaves (pale and coarse) facing outwards.
- The use of the ‘template apparatus’, approved by Finnvihta, is recommended when tying a sauna whisk.
- A reception inspection is carried out on all whisks.
- Sauna whisks must be fresh, no more than two days old.
- Whisks are stored in a cool, dry and airy place to avoid ‘burning’.
Binds
- A sauna whisk is tied together using a year-old willow bind that has no side shoots.
- Length 80 cm.
- The willows can be gathered between autumn and spring, before the new growth season.
- They are stacked together and stored in a dry place.
- Before use, the willows are immersed in hot water.
- The bind is twisted and then tied around the handle in two places, and finally the end is woven through the handle.
The information on the page was compiled by Hannu Maasola.
How to make a sauna whisk
- Before twisting the bind, the bark on all sides is scraped off by pulling the bind against a knife blade resting on your knee.
- Start twisting the bind from top towards the bottom while holding the bottom end firmly under your foot. Hold on to the bind with both hands and do not allow it to unravel. Continue twisting towards the end, but leave a section of 7–8 cm in length untwisted. Once the twisting is done, debark the whole bind and sharpen the bottom end.
- When ready, start laying the whisk. Always add new branches to the top of the whisk, aiming for a fan shape and pointing the backs of the leaves towards yourself. When you have laid roughly half of the branches, turn the whisk around and lay the other side similarly, always adding new branches to the top with their backs pointing upwards. When placing the branches, make sure no overly long ones are sticking out, creating a whip-like effect. Tear off any leaves and side shoots from the handle. The whisk should be slightly flat and shaped like a fan.
- Once the whisk is big enough, take a bind and begin tying your whisk. Push the sharpened end of the bind through the handle, near the leaves. Leave around 15–20 cm of the bind’s leafy end section out and bend it against the rest of the leaves, pressing it under your palm.
- Now – before the tying – add more twists to the bind. Once a sufficient number of twists have been added, wind it around the handle twice and push the end through both loops to tie off, pulling the bind tight.
- After the first loop is complete, make sure that the bind is twisted enough and then push the sharpened end again through the handle, this time approximately 10–12 cm from the first loop towards the end of the handle. Wind the bind once around the handle.
- Push the end through this loop to tie it off and pull it tight. Then, repeat this step, pushing the end through the loop once more and pulling it very tight.
- Once both loops are complete and firmly tightened, bend the remaining end of the bind under your palm while you cut the ends of the whisk’s branches to an even length (do this to avoid cutting the bind as well).
- When the branch ends have been trimmed, twist the remaining length of bind, push its sharpened end through the same spot where it comes out from and finally push it inside the handle between the other branches, leaving a hanging loop of about 6–8 cm in size. Twist this final loop into a figure eight.
- It is important to remove any sharp side shoots that you can feel on the handle with a knife. No matter how good the whisk would otherwise be, a sharp twig pressing against your hand when using the whisk will make you angry enough to throw it away and never touch a sauna whisk again.
- And here it is: a finished sauna whisk. Now all you need to do is start using it. Fill a relatively large container with water that is almost cold, and submerge the entire whisk there when not in use. NEVER put a whisk in hot water or on the hot stones of a heater. You should also never leave it lying on a hot bench inside the sauna.
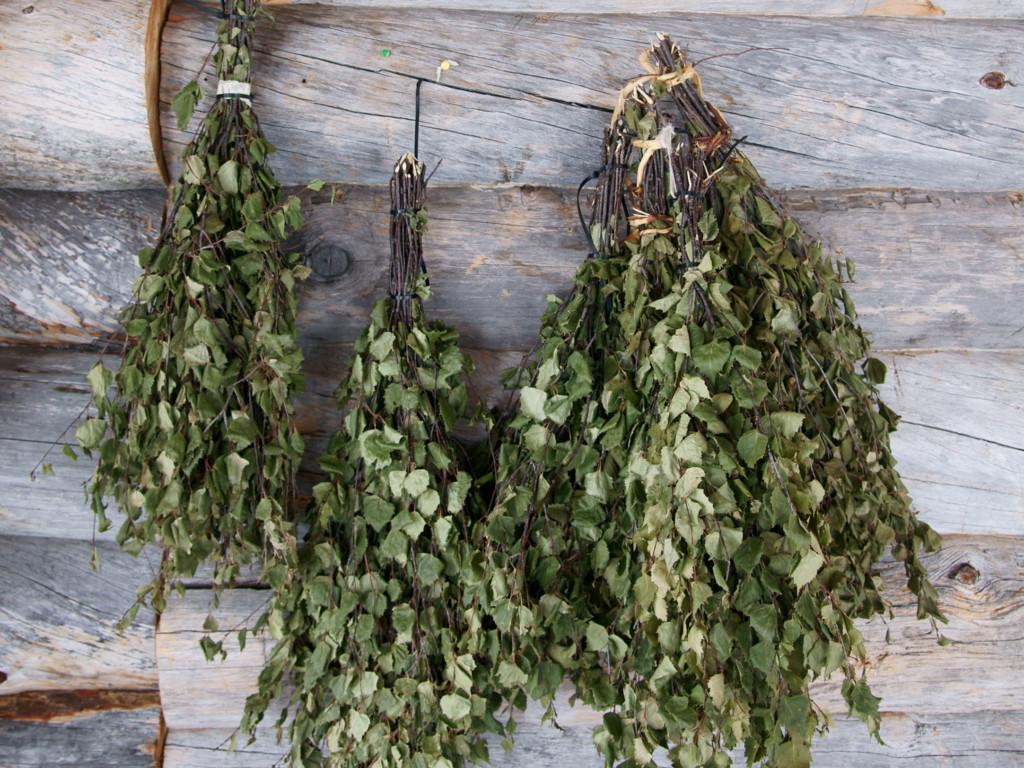
Freezing and drying
According to sauna whisk expert Pentti Hakala, freezing is a good way of preserving sauna whisks. Whisks are put in a plastic bag immediately after they are made, excess air is squeezed out of the bag, the bag is sealed and finally pulled into a cardboard tube or packed in a cardboard box. The whisks are then frozen. To defrost a whisk, let it sit in room temperature for approximately 1.5–2 hours. Alternatively, sauna whisks can be dried by hanging them up in a cool and dark place with good ventilation. Before using a dried whisk, immerse it in warm water for approximately 1.5–2 hours.
Pentti Hakala
The information on the page was compiled by Pentti Hakala, who also features in the picture above. He has been the chairperson of sauna association Löylynlyöjät since 1987, in addition to which he won the Finnish sauna whisk making championship in 1993, became a Sauna Master in 2000 and won the world championship in whisk making in 2001.